Table of Contents
Cloning the Bolt source from GitHub
Clone Bolt
There are many available git clients for both Windows ® and Linux ®. If you are already familiar with git, the quick start instructions are to choose your favorite client and issue a git clone https://github.com/HSA-Libraries/Bolt . If you are not familiar with git, you have to first install a git client on your host OS in order to 'clone' the Bolt code onto your computer. For Linux ®, if git is not already included in your distribution (type git –version at your commandline), then most likely you can still use the native OS's package manager system to easily install the git package; the package is usually called 'git' or 'git-core'. For Windows ®, a variety of options also exist, but you may have to manually install a package that you download from the web. The recommended package that seems easiest to use is GitHub for Windows ®. Once installed, it helps you create a GitHub account if you don't already have one, and creates private/public RSA keys that are tied to your account that allows git to remember who you are so that you don't have to type your credentials every time you want to push or pull code from github. However, if you want to use the the most current version of git, that is freely available from http://git-scm.com/downloads. With either package, you may open a git prompt and clone the repository.
Forking the Bolt source from GitHub
Fork Bolt
GitHub maintains a concept of forking a project, separate from the idea of cloning a project. After a github user account is created, it is possible to 'fork' a project into your personal account repository which is a complete copy of the original repository. It will have a slightly different upstream URL that includes your account name and you can start hacking on the code as you please. You may issue a 'pull request' back to the original project if you feel like your code contribution will be useful. At the top right corner of the Bolt GitHub page is a button that forks the Bolt code into your private repository. This is a nice shortcut as the button will create the new repository with multiple upstream URL's, allowing new code to be fetched from either the original repository or your own.
Bolt branches on GitHub
Using CMake build infrastructure
CMake Overview
Bolt does not provide Microsoft Visual Studio project files, makefiles, or any other native build infrastructure for its examples. Instead, the examples directory contains a file named CMakeLists.txt. Bolt uses CMake as a 'master' build system, and native build files, such as Visual Studio projects, nmake makefiles, UNIX makefiles, or Mac xcode projects are GENERATED with CMake. CMake is very similar to the autoconf tool 'configure', except that it is cross-platform.
NOTE: With CMAKE the native OS build files are GENERATED, so changes made to the native build files are overwritten the next time cmake runs.
CMake is freely available for download on the web from:
http://www.cmake.org/
OpenCL™ Dependencies
Bolt's OpenCL™ projects have a dependency on the AMD APP SDK and the AMD OpenCL ™ runtime provided by the Catalyst ™ drivers. OpenCL ™ is regarded as a cross-platform, vendor-neutral API and BOLT uses the C++ static kernel template extension available in the AMD OpenCL ™ implementation that to date are not found in other vendor implementations. During its configuration, CMake requires an environment variable to find the root of the OpenCL ™ installation. Provide this by defining the environment variable AMDAPPSDKROOT with the path to the root of the OpenCL ™ SDK, typically 'C:/Program Files (x86)/AMD APP' on Windows ® 64-bit machines. A more vendor-neutral environment variable is OPENCL_ROOT.
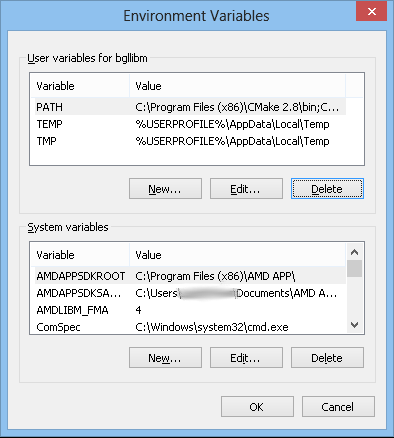
NOTE : On Linux ® , set the environment variable by 'export OPENCL_ROOT = /opt/AMDAPP/'
CMake ships with several interfaces to help a developer generate native build files. CMake has a GUI interface called CMake-gui that incorporates the traditional point-and-click conventions of buttons, list boxes, and search boxes. For CLI-based sytems (including CMD from Windows ®), CMake has a native command-line executable (the GUI is just a wrapper around the command line). The command line executable is useful, even in Windows ®, for scripting purposes, such as might be used with automated and continuous build systems.
CMake Bolt Configuration
Once installed, the easiest interface for Linux ® or Windows ® is the CMake GUI program 'cmake-gui' . The terminal applications CMake.exe and ccmake.exe (based on curses library) are easy to learn. CMake automates the creation of build environments in a cross-platform manner, generating native build files for each respective platform. When launched, it inspects the host computer and searches for all tools, SDKs, libraries, and code necessary to build the project.
Bolt/superbuild contains all the CMake files necessary for configuring Bolt. In the CMake Window, enter the source code and binary URIs as given in the image below and press Configure. You can also use the 'Browse Source ...' and "Browse Build..." buttons to navigate to the superbuild and binary folder. It is better not to put the bin directory inside any folder which has a .git folder as a sibling or as a parent structure.
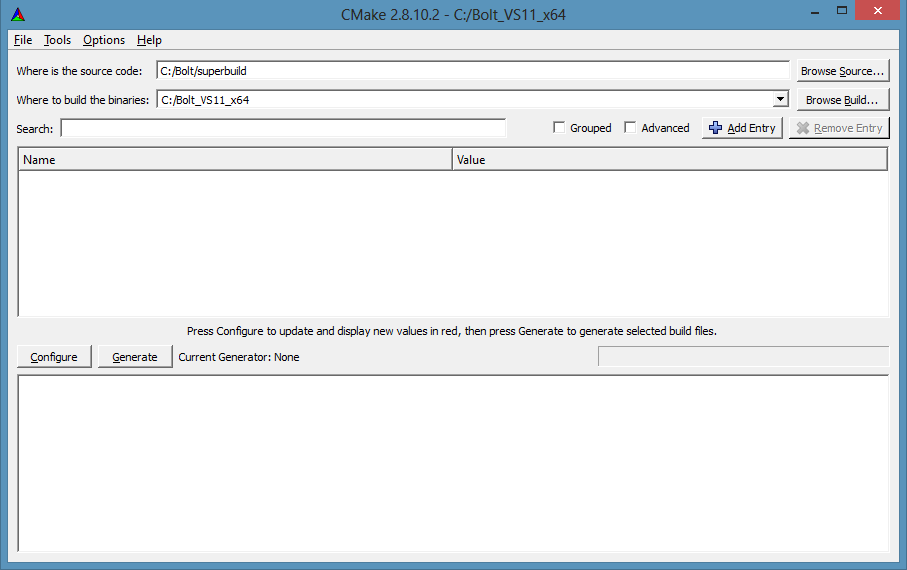
Then, click on the Configure button. This will ask you for your choice of generator. You can choose to use Visual Studio 10/11/12. In this example, 'Visual Studio 11 Win64' generator is selected. The selected bin directory should be descriptive of the generator used ; otherwise it's easy to start over (delete the binaries directory). On Linux ®, choose the Unix Makefiles option. After selecting the generator, CMake examines the system, finding all the project dependencies and properties, which appear red in the properties box.

While CMake finishes configuring the projects, it prints messages in the output log visible in the bottom textbox within the GUI; this states that CMake found the OpenCL ™ and Bolt libraries. If not, CMake prints in red text which libraries or header files are missing. This usually means the environment variables that CMake uses to find dependencies are not set up properly (see OpenCL™ Dependencies ).
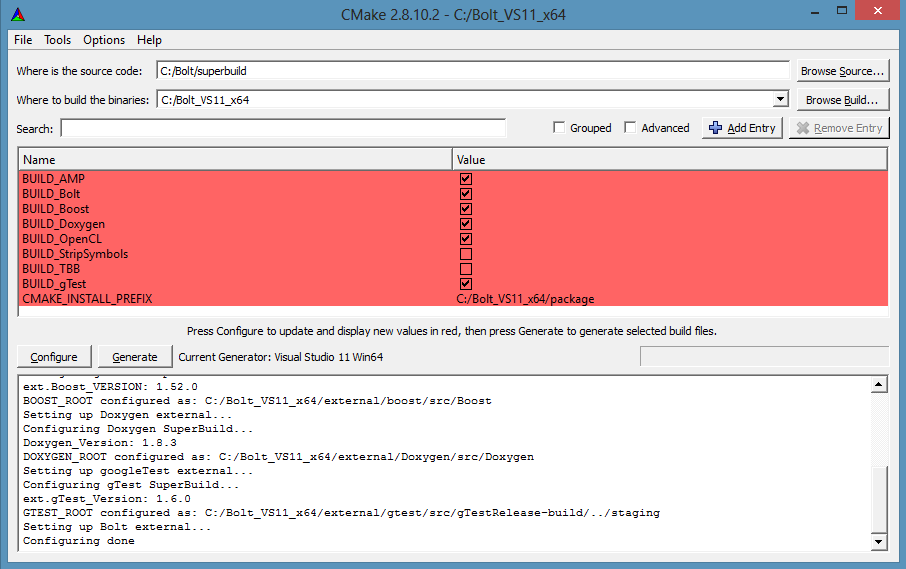
CMake gives you some values which represent some features that you can choose to generate. In this example below, we chose not to generate BUILD_TBB (see TBB (Intel) on how to build TBB for Bolt). Now, press the Configure button again to continue, and then press Generate button to complete the generation of binaries. Now, all the project files will be generated to the specified location.
NOTE: On Linux ® , do not select the BUILD_AMP feature.
Startup projects
On Windows ® , after a successful configuration pass, the directory specified initially in the 'Where to build the binaries:' textbox contains an 'Bolt.Superbuild.sln' file, which can be opened in the appropriate version of Visual Studio. At this point, selecting the 'Build Solution' menu item builds all the samples selected. By default, Visual Studio will have the 'ALL_BUILD' project selected as the 'Startup' project. If a particular solution must be run under a debugger, mark it 'Startup' by first right-clicking on the project, then selecting 'Set as Startup Project'. On building this solution, required libraries such as Boost, Doxygen, and Gtest are downloaded, and it also builds all the projects in Bolt. To start developing, go to Bolt-build folder in your binary folder and open 'Bolt.sln'. This will have all the project files i.e. Tests, Benchmarks, Tools, Runtimes etc. You can build tests for projects by setting it as a 'Startup' project and by building the project. You run the tests (Google Tests) by clicking the start button in the Debug Menu in Visual Studio.
On Linux ®, open the terminal and change the directory to the one specified initially in the 'Where to build the binaries:' Run make in that directory for superbuilding BOLT. Change the directory to Bolt-build and run make to build all project files. Indivisual projects can also be built by running make in the corresponding project directory.
Supported compilers
On Windows ® , Bolt currently uses type traits introduced in Visual Studio 2010. We hope to support additional compilers at some time. On Linux ® , GCC is supported. We also hope to add MinGW support in future.
Code layout
This is a list of bolt directories: Bolt/
- bench/ - contains benchmarking codes for Bolt routines.
- bolt/ - contains bolt runtime library calls. Contents are packaged as a bolt binary library.
- doxy/ - contains files required for generating the doxygen documentation for Bolt.
- examples/ - contains some example codes on how to use Bolt.
- include/ - contains header files and inline files of all the supported Bolt routines.
- superbuild/ - contains CMakeFiles required to build a superbuild binary file for Bolt.
- test/ - contains testing solution files for all the routines in Bolt.
- tools/ - contains some useful scripts and codes.